Overview
The HitPay QuickBooks integration automatically syncs your sales, processing fees, and refund data from HitPay to QuickBooks Online. This keeps your books up to date without manual data entry.What Gets Synced
Each of the following items only syncs when its corresponding account is configured in your settings. You can choose to sync all of them, or only the ones relevant to your bookkeeping workflow.Prerequisites
- A QuickBooks Online account (any plan — Simple Start, Essentials, or Plus)
- A HitPay business account with admin access
Connecting QuickBooks
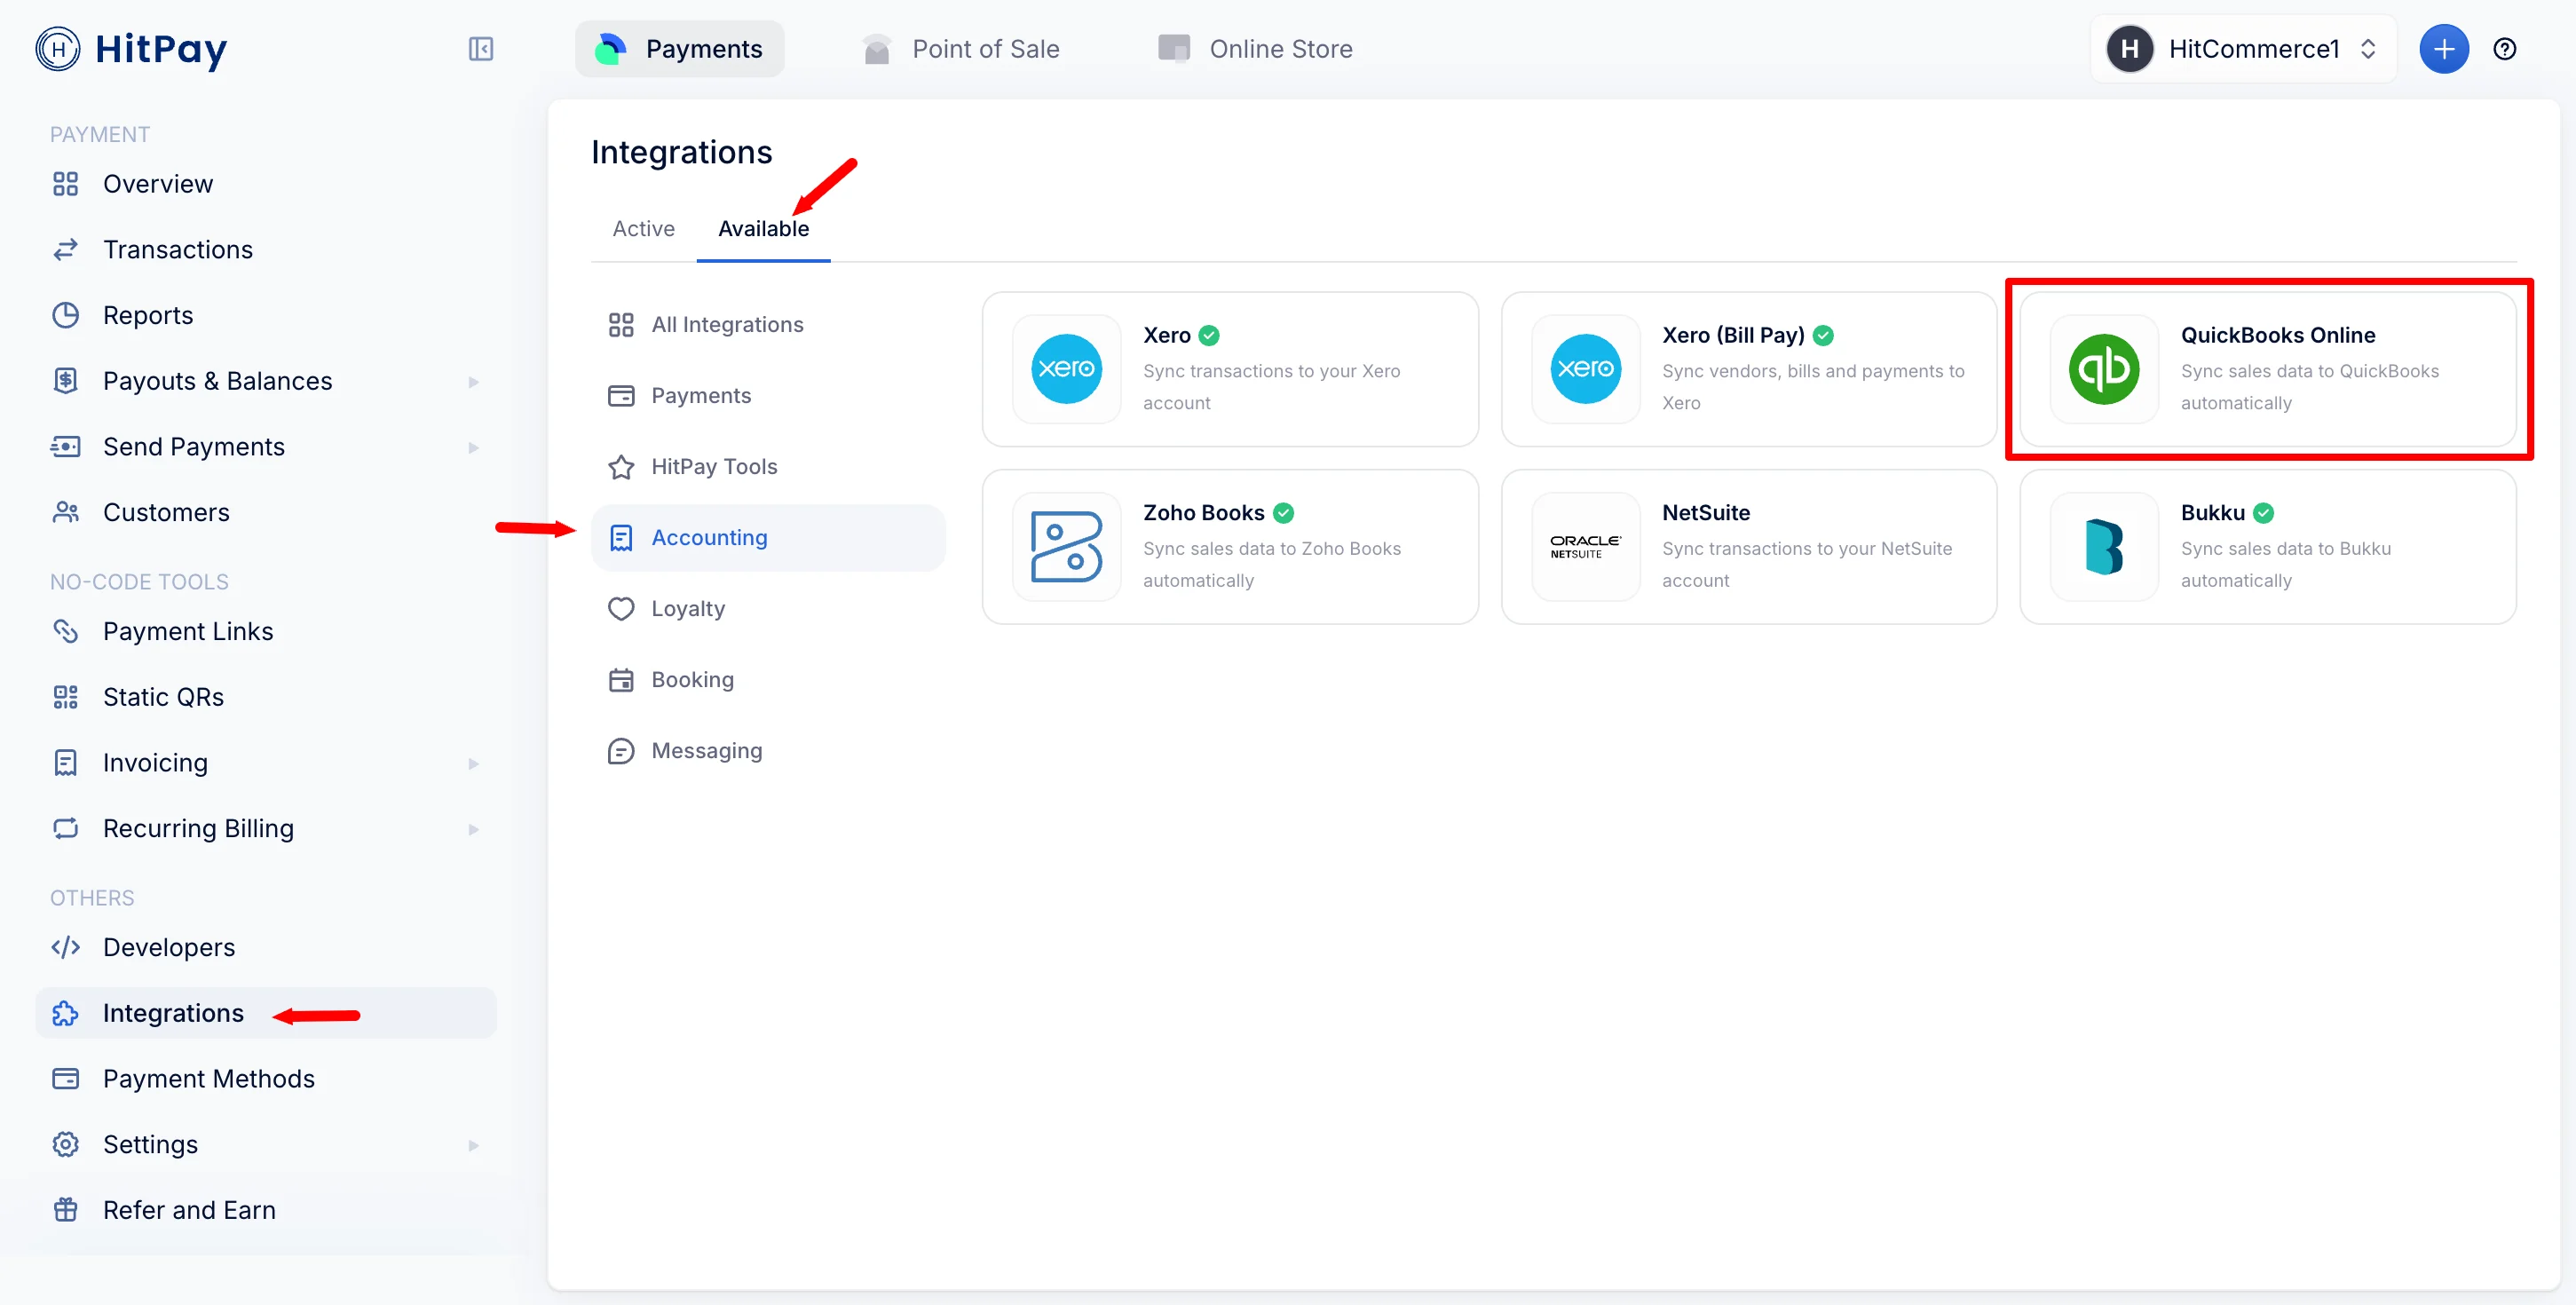
- In your HitPay dashboard, go to Others > Integrations.
-
On the Available tab, find the QuickBooks Online card under the Accounting category and click it. Then, click Connect to QuickBooks.
- A popup window will open prompting you to sign in to your QuickBooks account and authorize HitPay.
-
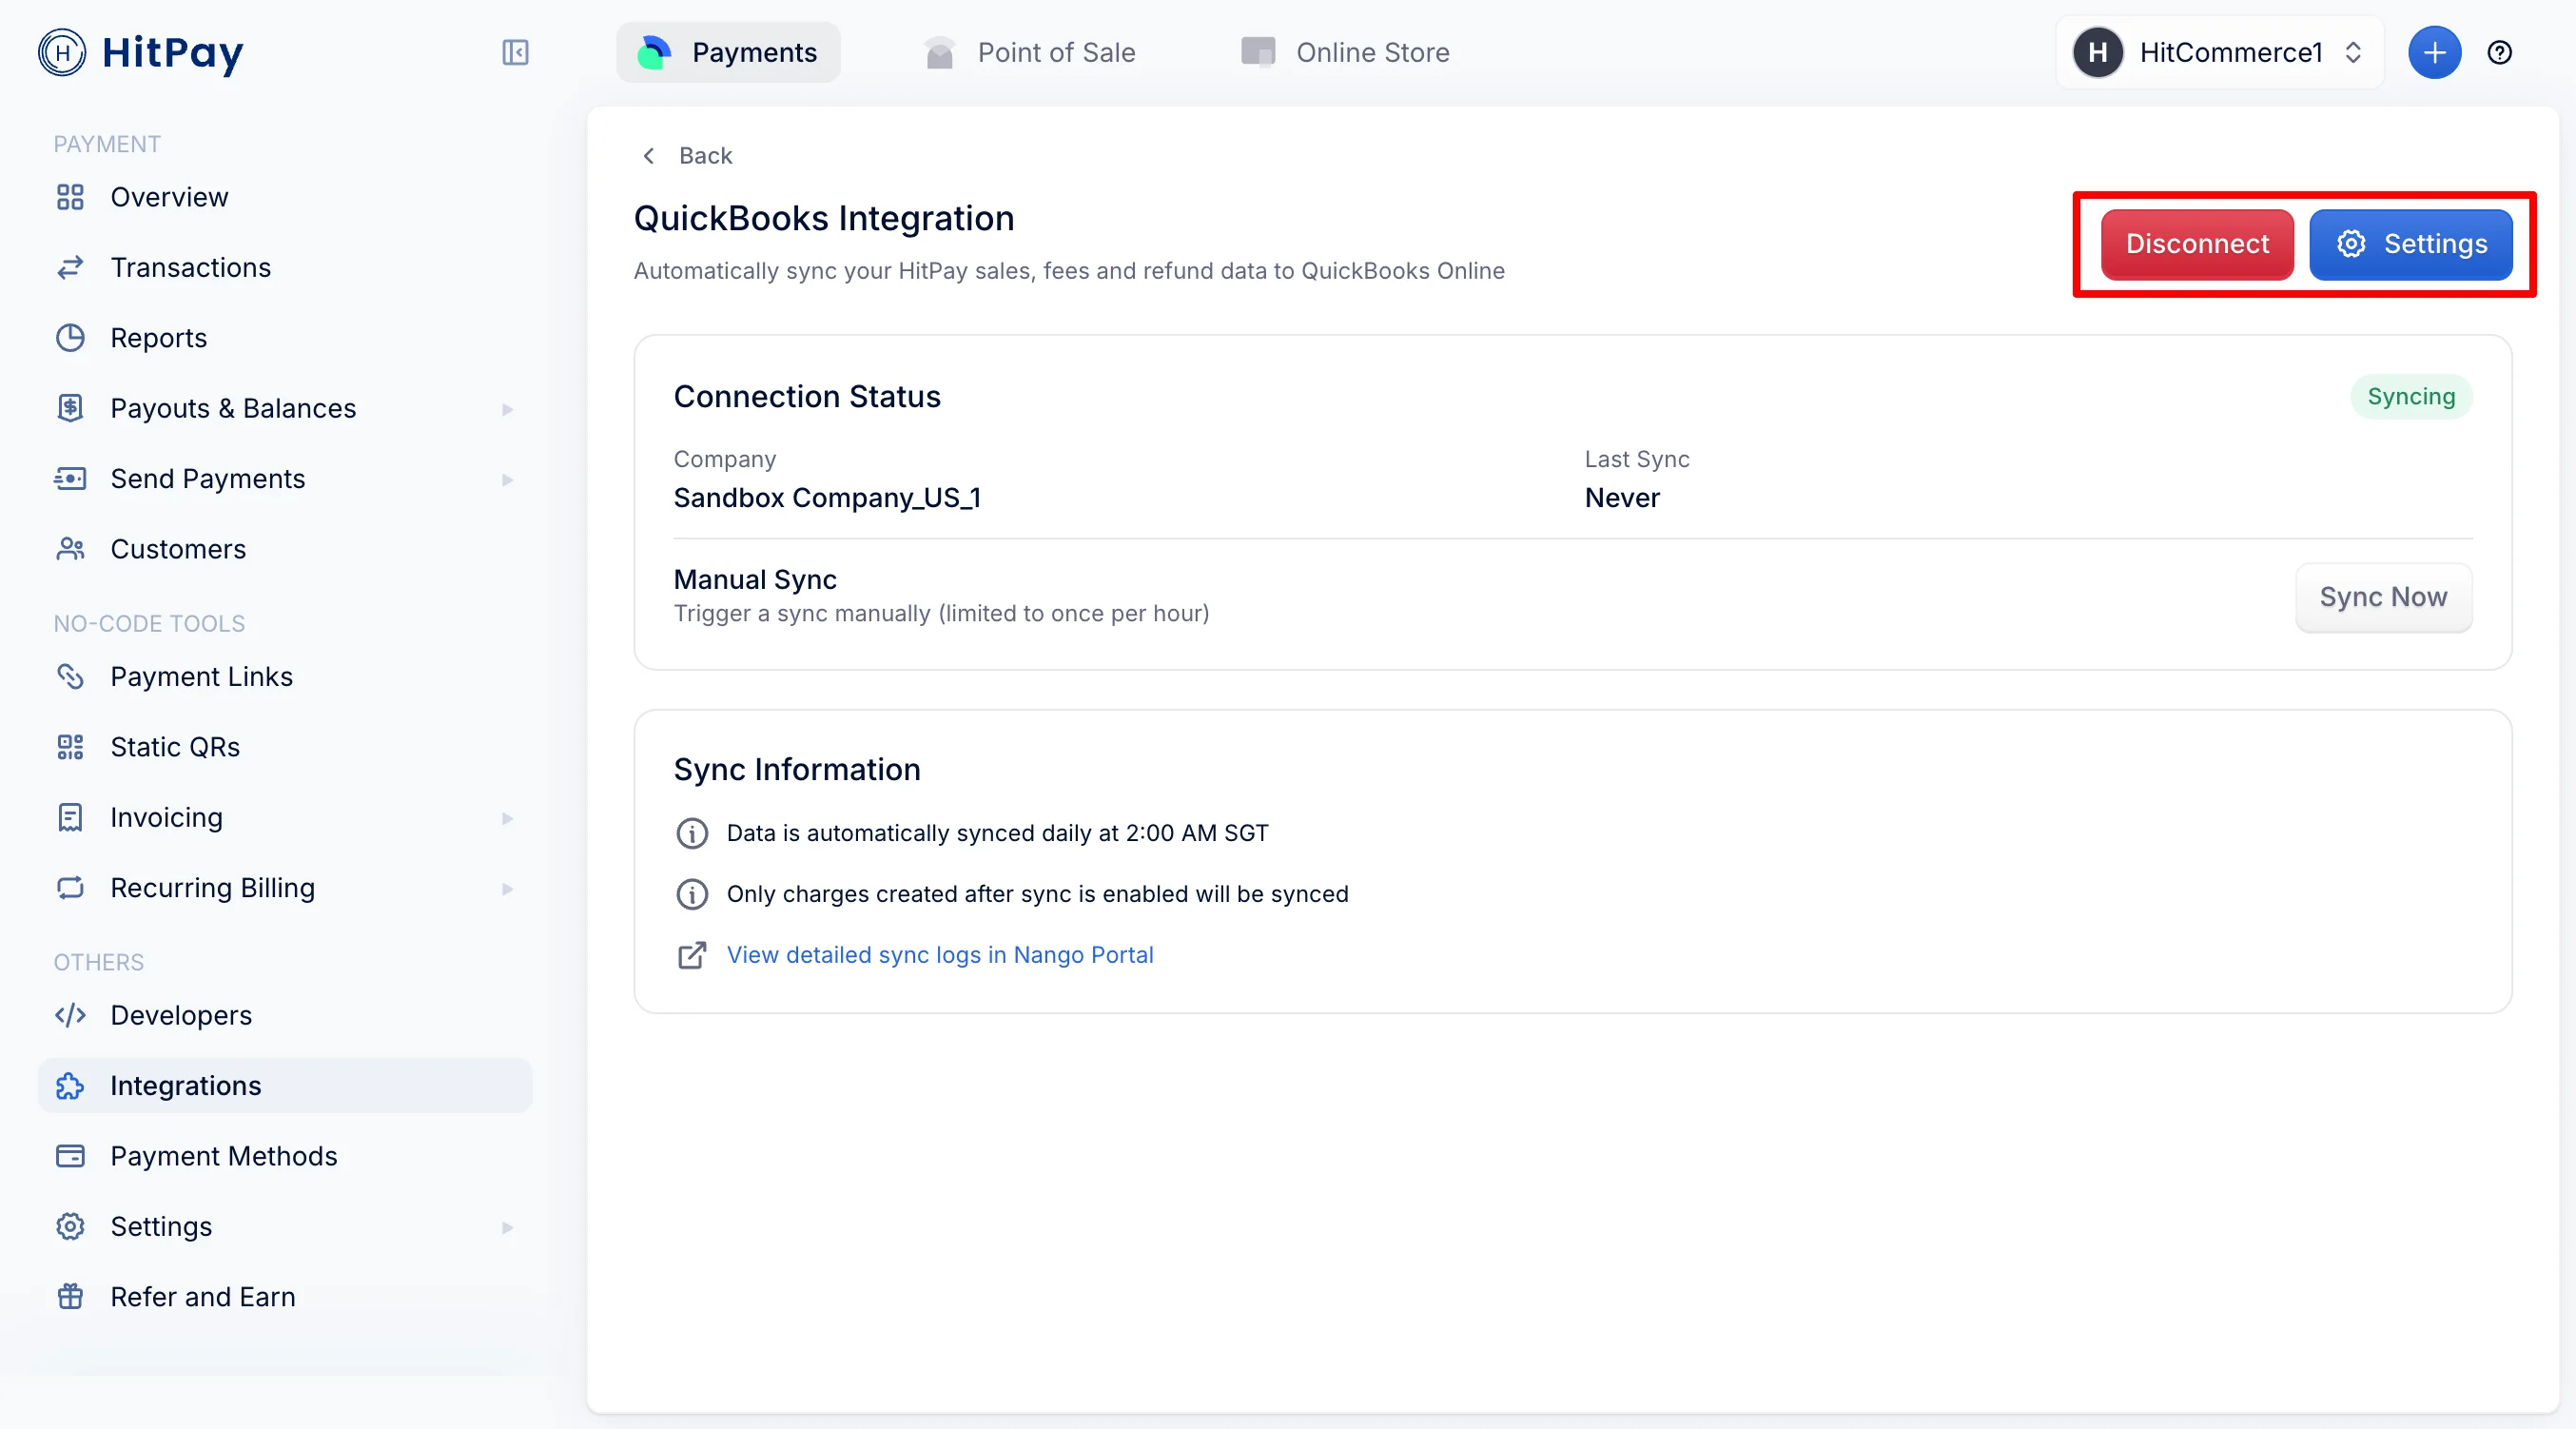
After authorizing, close the popup. HitPay will confirm the connection — you will see your QuickBooks company name and connection status on the integration page.
Each QuickBooks company can only be connected to one HitPay business. If the company is already connected elsewhere, you’ll see an error message.
Configuring Sync Settings
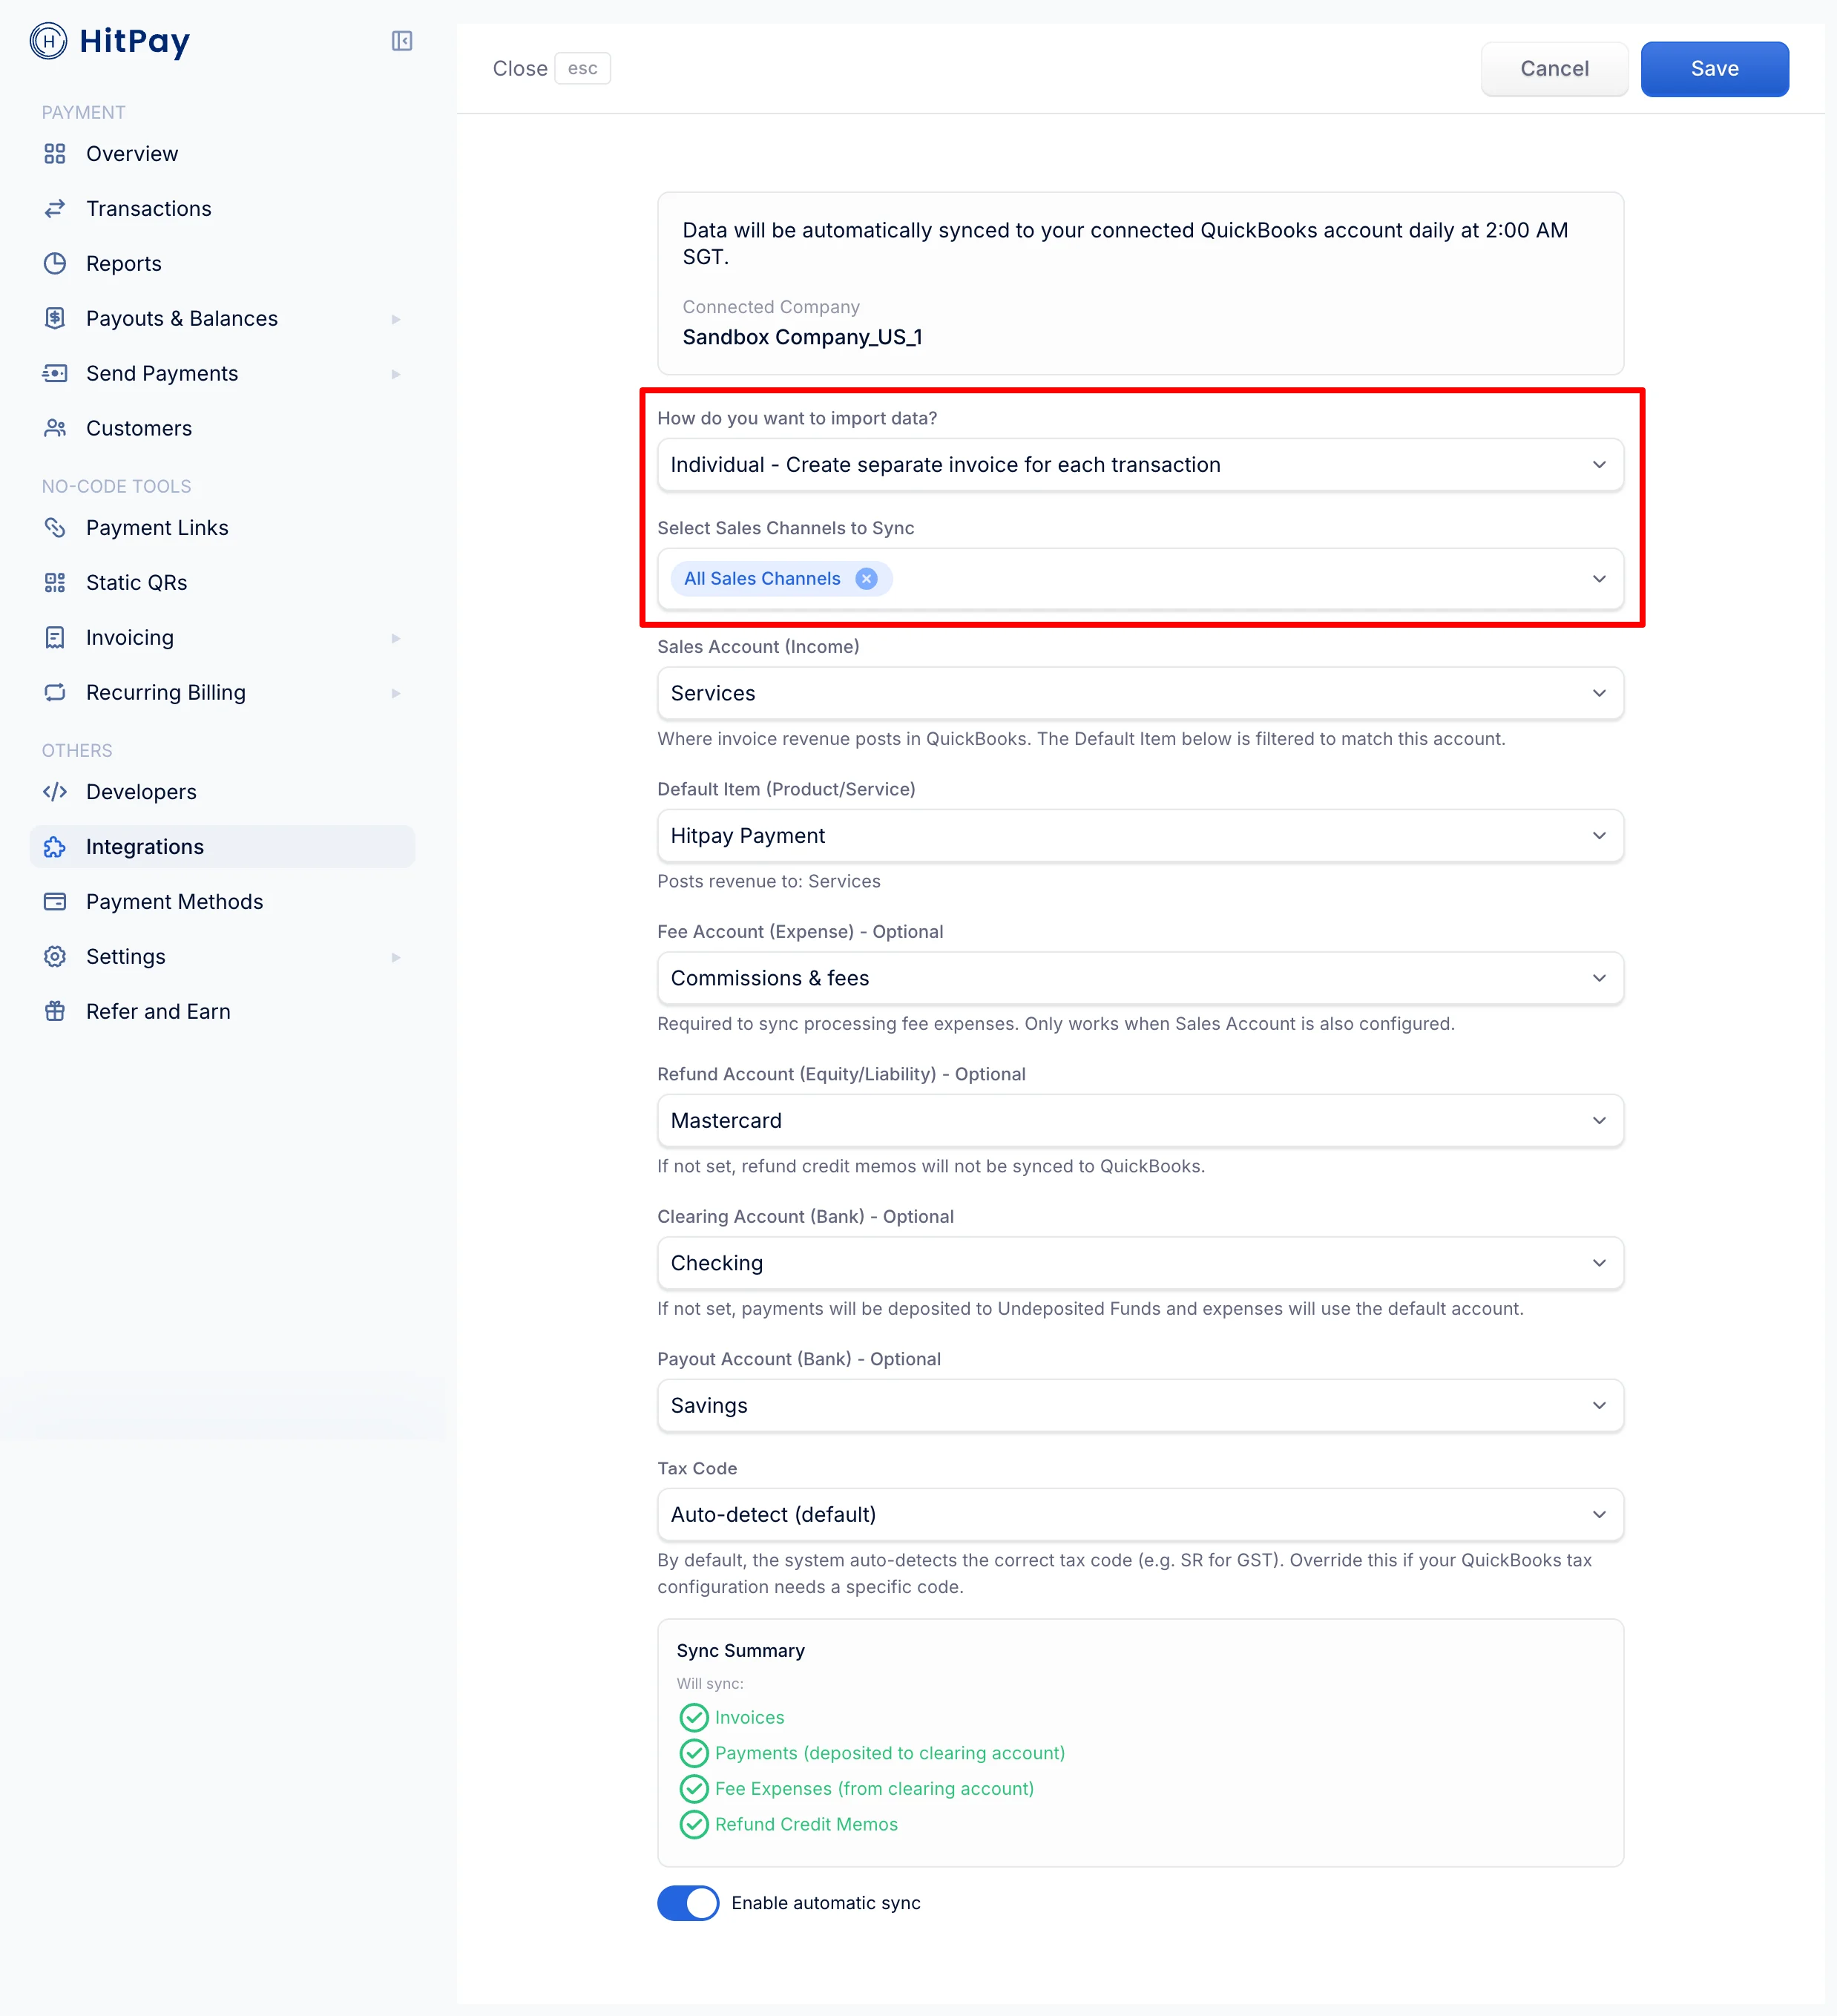
After connecting, click Settings to configure your sync preferences.Invoice Grouping
Sales Channels
Use Select Sales Channels to Sync to choose which sales channels are included:- All — Sync every charge regardless of source
- Or select specific sources: Shopify, WooCommerce, Point of Sale, Payment Links, Online Store, Recurring Billing, etc.
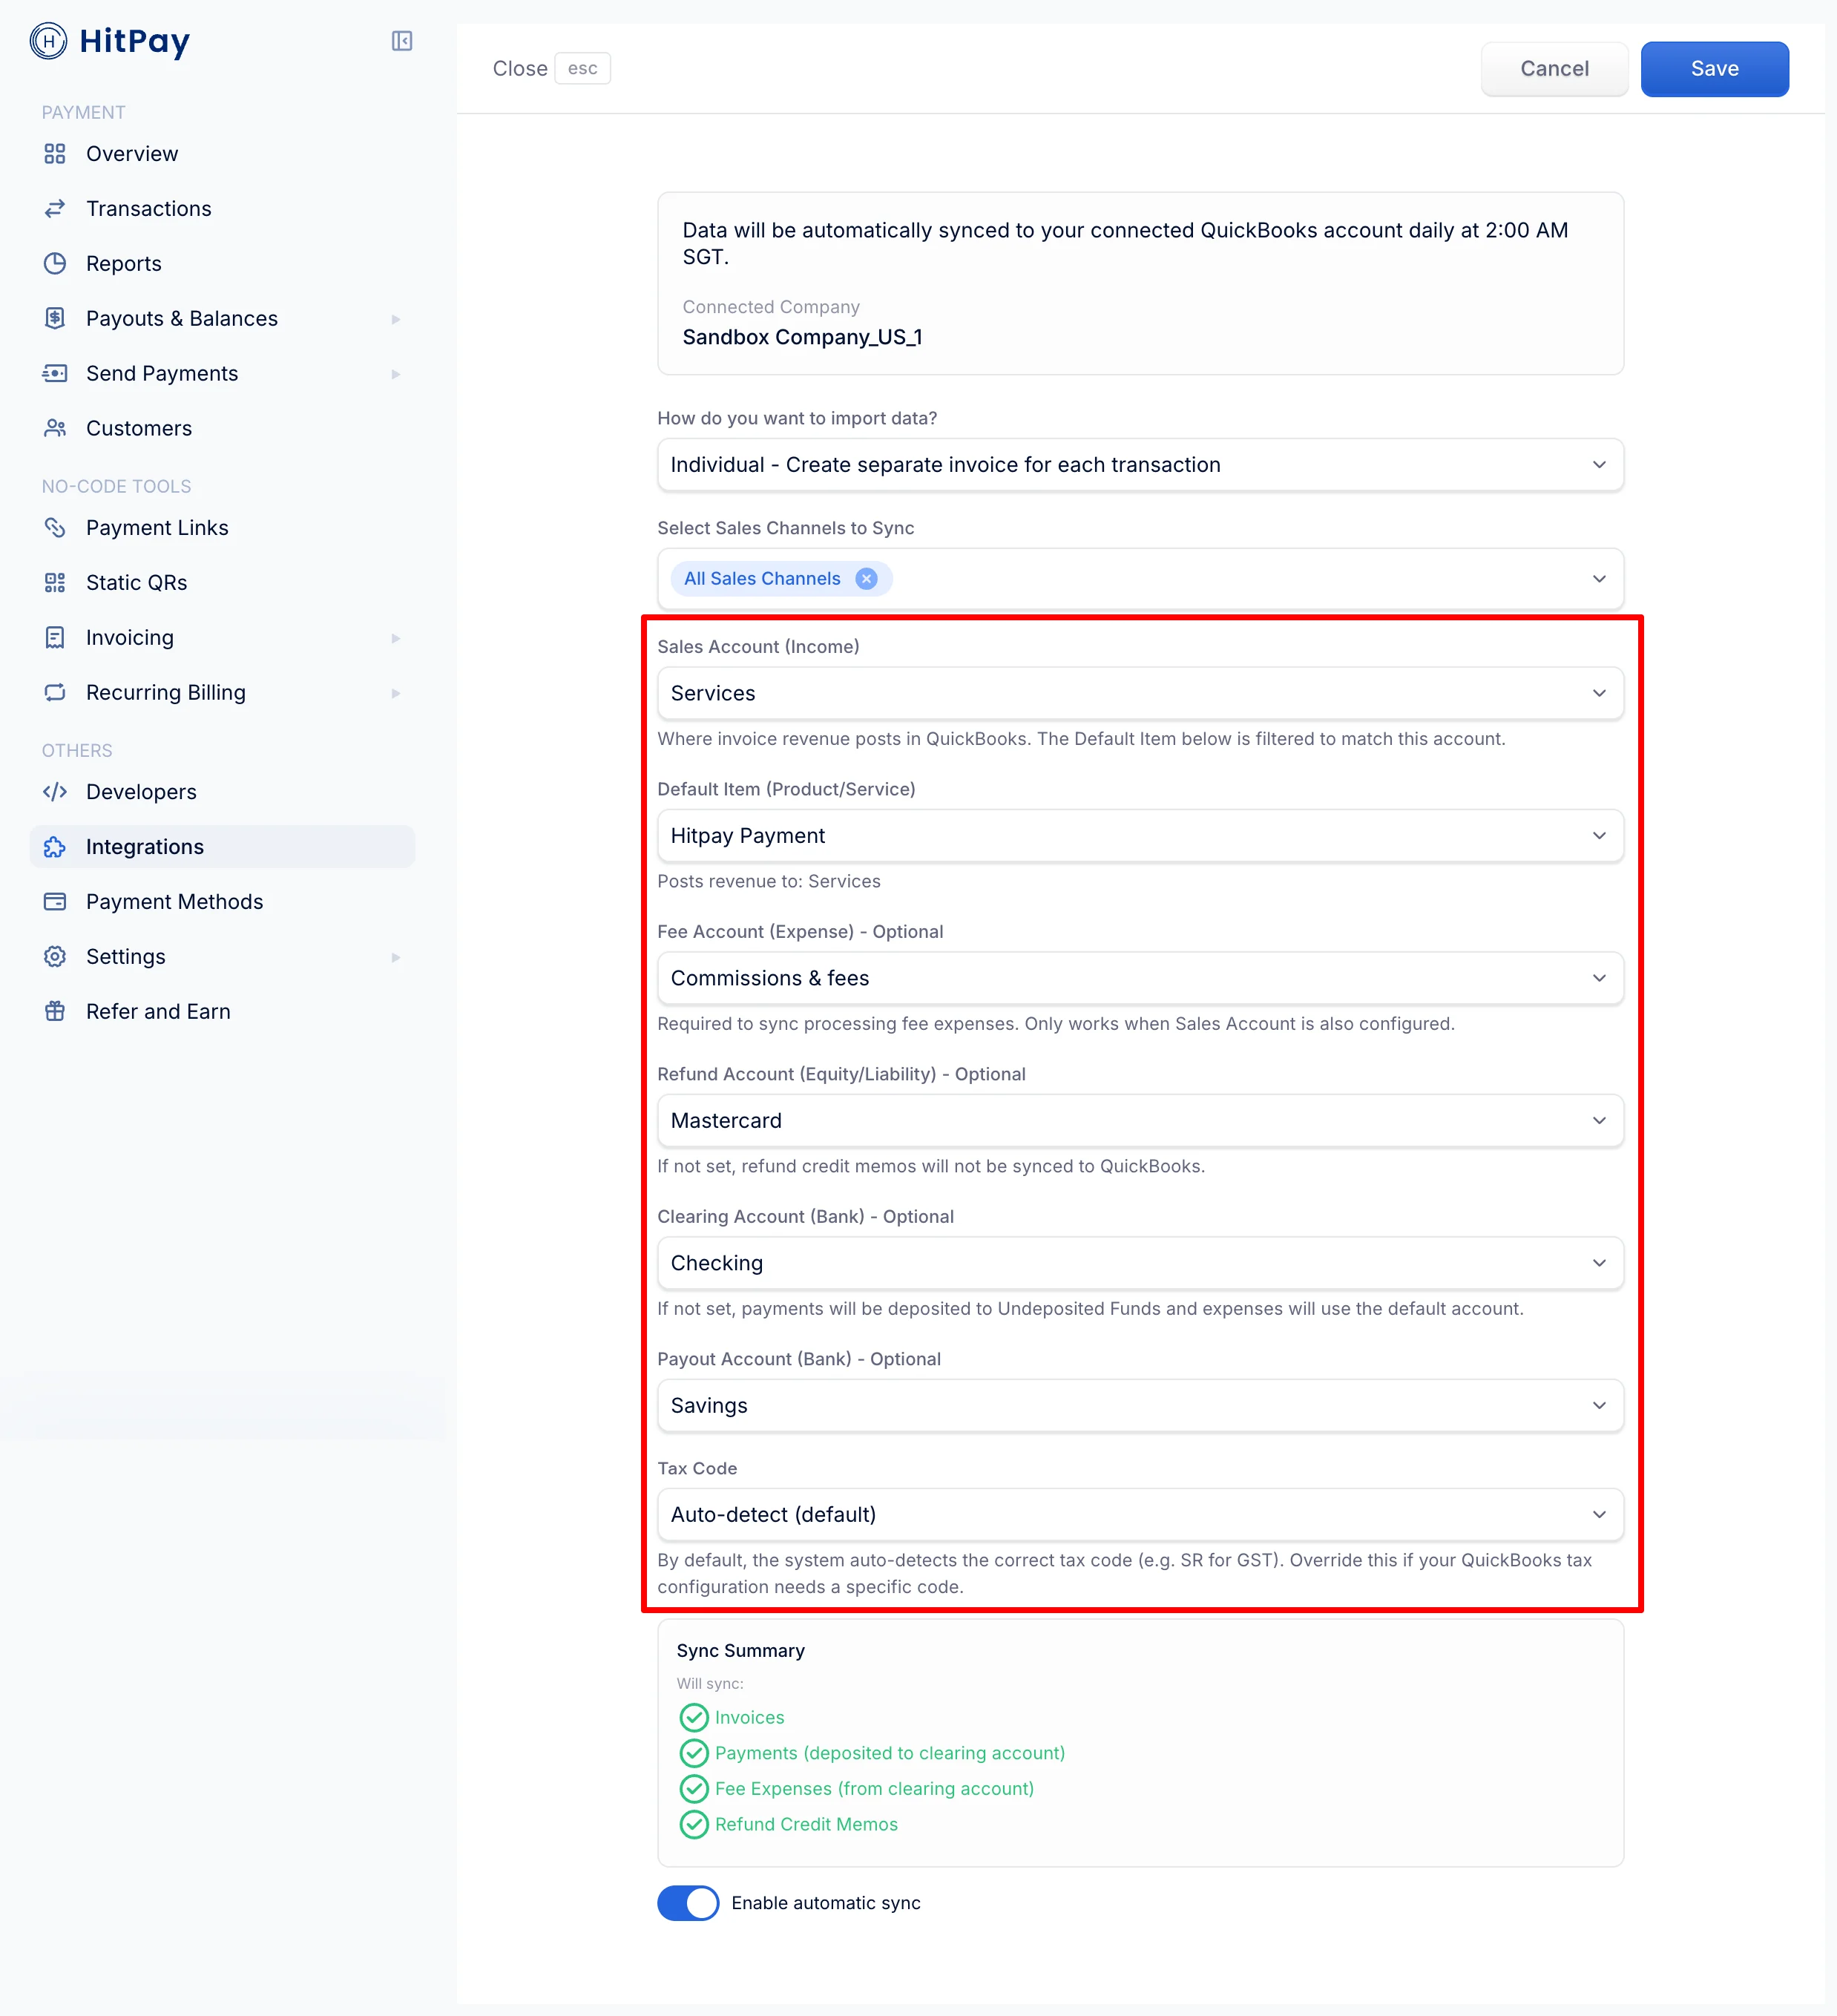
Account Mappings
The Sales Account is required to enable sync. The other mappings are optional — HitPay only syncs the corresponding items for accounts that are set up.*A Clearing Account (Bank) is required when a Fee Account is set, because QuickBooks records processing fees as expenses paid from a bank account.
Flexible account type matching: HitPay uses QuickBooks’ Classification field to validate accounts, not just the specific AccountType. This means related account types work automatically across all QBO regions. For example, both “Income” and “Other Income” accounts are accepted for the Sales Account because they share the “Revenue” classification. Similarly, both “Equity” and “Other Current Liability” work for the Refund Account because HitPay accepts both the “Equity” and “Liability” classifications.
Default Item
Select the QuickBooks Product/Service item that appears on each synced invoice line. This is required to enable sync. The dropdown is filtered to items whose income account matches your selected Sales Account, so invoice revenue always posts to the account you chose. If you change the Sales Account, re-select a matching item.Tax Code
Controls the tax code applied to synced invoice and credit memo line items:- Auto-detect (default) — HitPay automatically detects the appropriate tax code from your QuickBooks company (e.g., GST for Singapore companies)
- Specific tax code — Pick a tax code to apply to all synced line items, overriding auto-detection
Enabling Sync
After configuring your accounts, toggle Enable automatic sync on. HitPay will only sync charges created after the moment you enable sync — no historical charges are synced retroactively. If you disable and re-enable sync later, only new charges from the re-enable point forward will be synced. Charges created during the disabled period are skipped.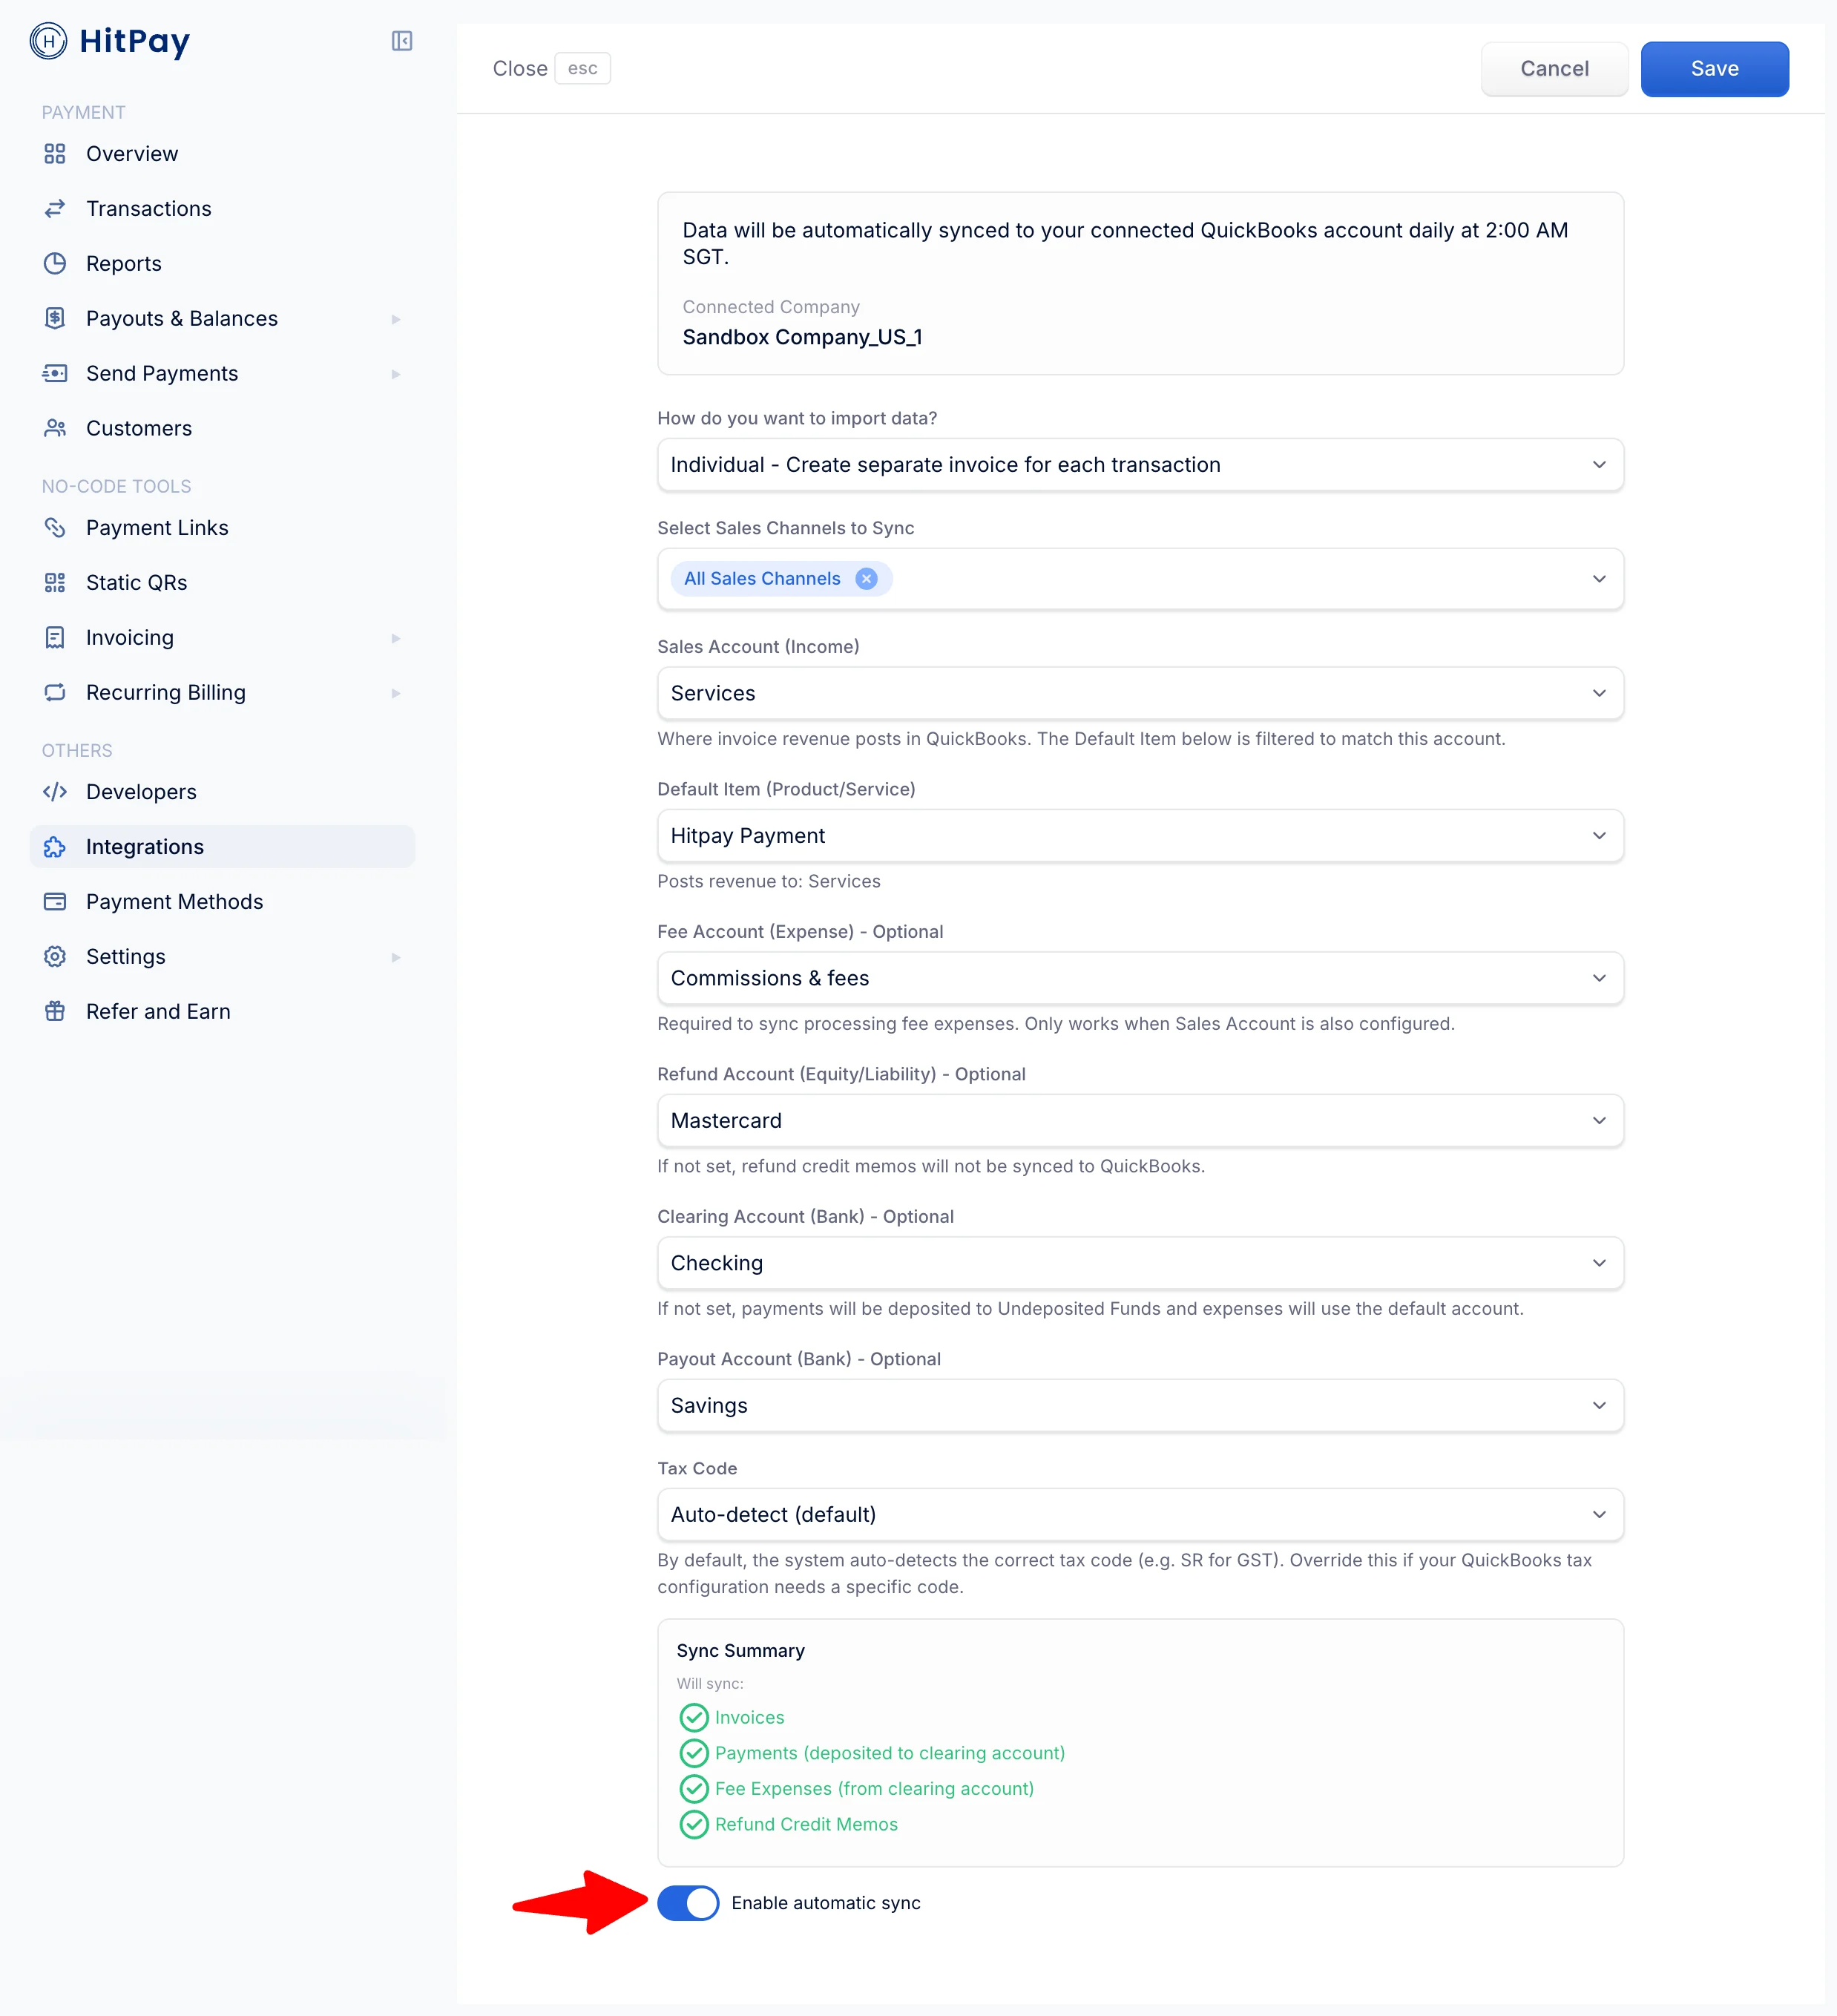
How Syncing Works
Automatic Sync
HitPay runs an automatic sync daily at 2:00 AM SGT. All charges since the last sync (or since sync was enabled) are processed.Manual Sync
Once sync is enabled, a Manual Sync section appears on the QuickBooks integration page — click Sync Now to trigger a sync immediately. Manual sync is limited to once per hour.Sync Process
For each charge, HitPay creates the following records in QuickBooks (depending on which accounts are configured):- Invoice — Records the sale amount
- Payment — Marks the invoice as paid, depositing to your bank account
- Expense — Records the HitPay processing fee (if fee account is configured)
- Credit Memo — For refunded charges, linked to the original invoice (if refund account is configured)
Idempotency
Syncing is fully idempotent. If a sync is interrupted or partially completes, the next run picks up where it left off without creating duplicates.Multi-Currency Support
HitPay handles multi-currency automatically:- In Bulk mode, charges are grouped by date and currency, creating separate invoices per currency
- In Individual mode, each invoice uses the charge’s original currency
- Your QuickBooks company must have multi-currency enabled if you process payments in multiple currencies
Sync Status & Errors
The QuickBooks integration page shows:- Connection status — Whether your QuickBooks connection is active
- Last sync time — When the most recent successful sync completed (it only updates when charges actually synced, so a failed run never masks the last real success)
- Sync results — Number of charges synced and any failures
- Recent errors — The last 10 sync errors with timestamps
Connection Failures
If your QuickBooks connection loses authorization (e.g., token refresh fails), HitPay will:- Automatically disable sync to prevent repeated failures
- Send you an email notification
- Mark the connection as Failed in the dashboard
Disconnecting
- Go to the QuickBooks integration page.
- Click Disconnect.
- Confirm the disconnection.
Important Notes
- Future-only sync — Only charges created after sync is enabled are synced. There is no historical backfill.
- Flexible account types — HitPay automatically recognizes related account types across QuickBooks Online regions using QuickBooks’ Classification system. You don’t need to worry about regional differences in account type naming (e.g., “Cash and cash equivalents” vs “Bank” both work for bank accounts if they have the correct classification).
- Account lists are cached for up to 1 hour — If you just created an account or item in QuickBooks and it’s not showing, use the refresh button in the settings to fetch the latest list.
- Tax codes — Synced line items carry a QuickBooks tax code (auto-detected, or the one you pick in the Tax Code setting). Amounts are synced as tax-inclusive.
Troubleshooting
Accounts not appearing in dropdowns
Accounts not appearing in dropdowns
If a QuickBooks account doesn’t appear in the expected dropdown:
- Check the account type — Each dropdown only shows accounts with compatible Classifications. For example, the Sales Account dropdown shows accounts with the “Revenue” classification (which includes both “Income” and “Other Income” account types).
- Check if the account is active — Only active accounts are shown. Archived or inactive accounts are hidden.
- Regional account types — QuickBooks uses different account type names in different regions (e.g., “Cash and cash equivalents” in some regions vs. “Bank” in others). HitPay handles this automatically through Classification matching, but if an account has an unexpected Classification, it may appear in a different group.
- Refresh the list — Click the refresh button to fetch the latest accounts from QuickBooks.
Sync not running
Sync not running
- Verify that Enable automatic sync is toggled on
- Check that a Sales Account and Default Item are configured (both are required for sync)
- Ensure your QuickBooks connection is in Linked status (not Failed)
Duplicate invoices
Duplicate invoices
HitPay tracks every synced record. If you see duplicates, it may be because:
- The same charge was processed through multiple payment sources
- A charge was manually created in QuickBooks before the sync ran
Connection shows 'Failed'
Connection shows 'Failed'
This typically means QuickBooks revoked or couldn’t refresh the authorization token. To fix:
- Disconnect the integration
- Reconnect by going through the OAuth flow again
- Re-configure your settings
- Re-enable sync