Overview
This section covers various aspects of managing products on HitPay’s Web Dashboard. Whether you’re adding individual products or importing products in bulk, we’ve got you covered with easy-to-follow instructions.Products
Adding products on HitPay is a straightforward process that allows you to sell your products on your online store. You have the option to add products one by one or by using the bulk upload option to streamline the process. This way, you can have your products ready for sale in no time. This guide will walk you through everything you need to know about products and the step-by-step process of adding products on into your online store.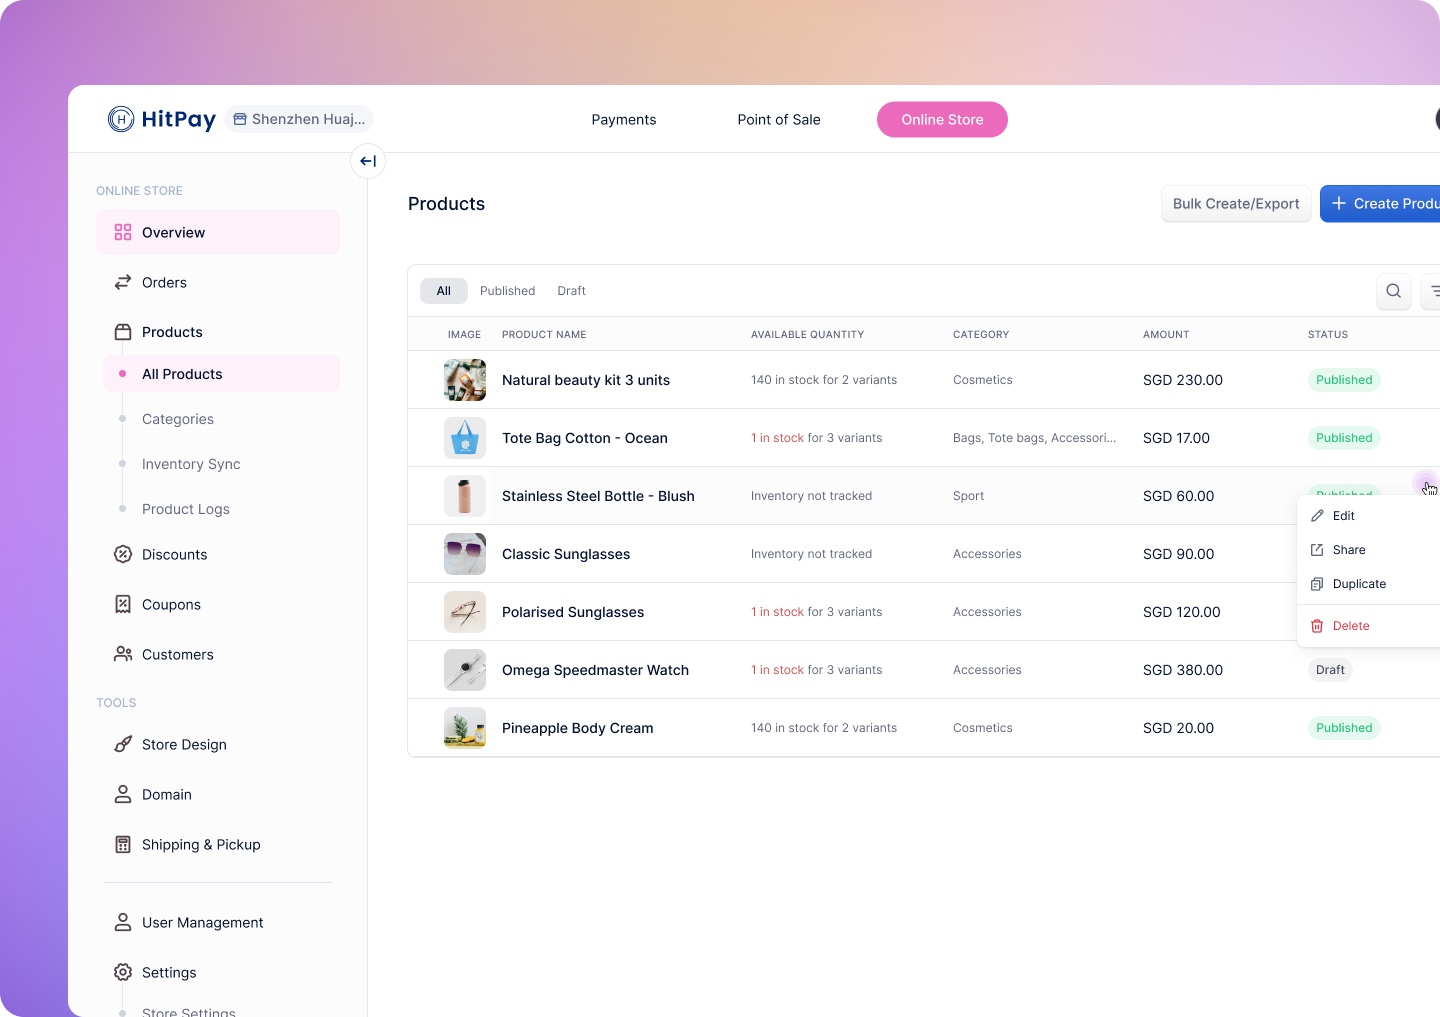
Adding Individual Products
From the web dashboard, navigate to Products > Products, click on the Add Products button to access the Add Product page. You have the option to add:- Product images
- Multiple product categories to enhance customer navigation
- Product variants such as size or colour
- Inventory status to add an order limit for a product and create urgency
Product Variations
You can add unlimited variations to each of your products on HitPay. Variations can include size, color, material or any other custom variation.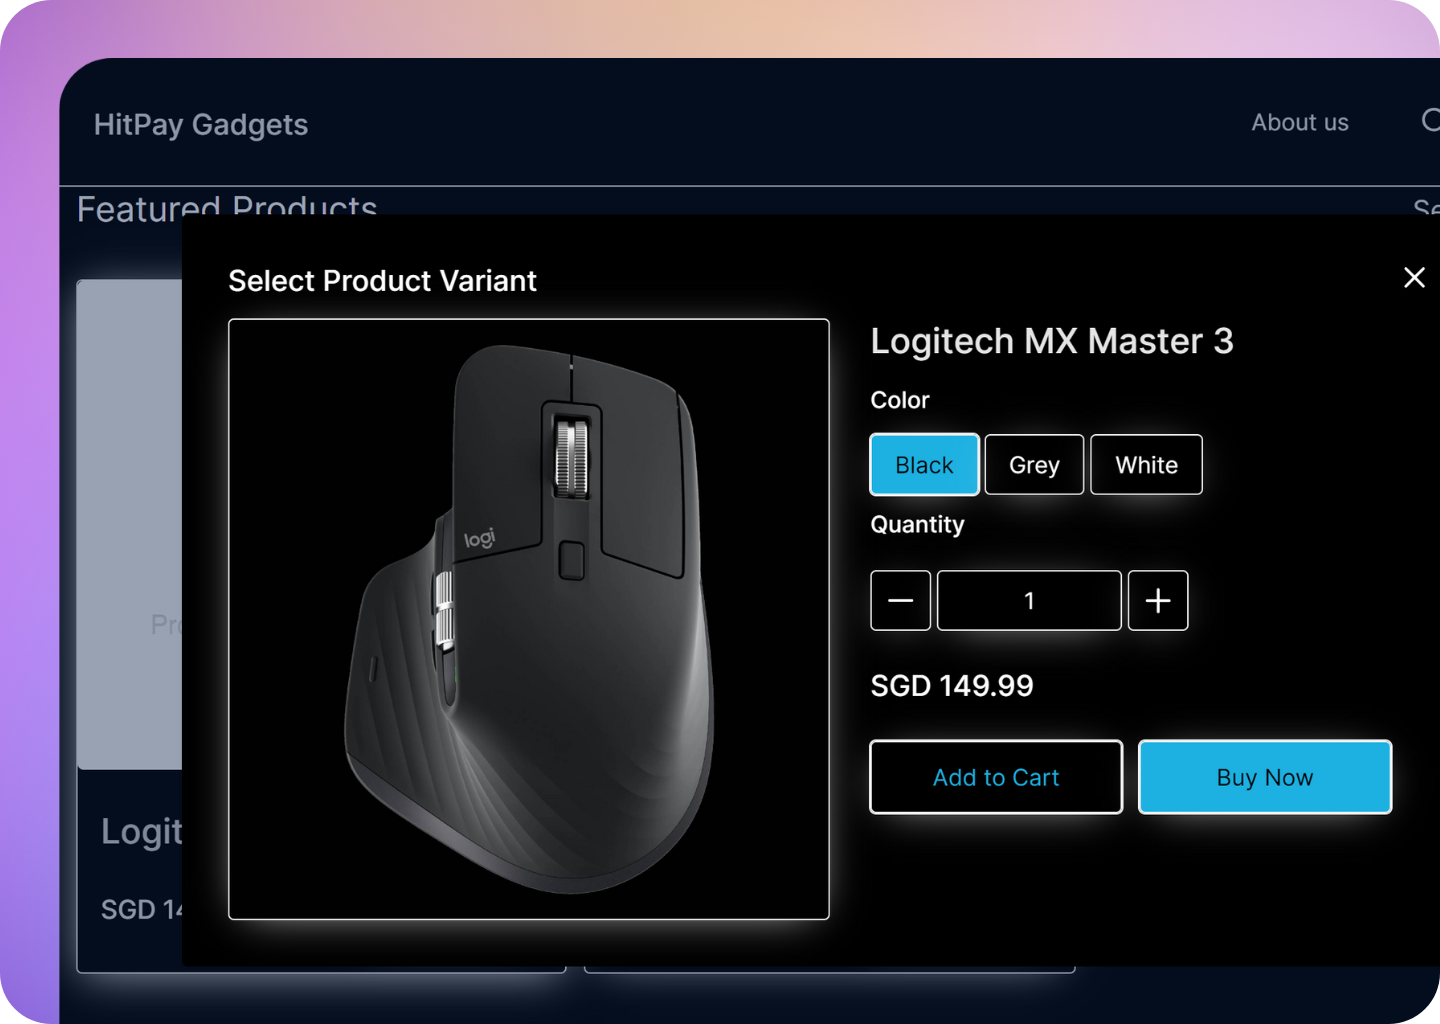
You can click on the “Others” button to add your own custom variant type
Featured Products
Featured Product option allows highlighting specific products that can be promoted easily on your online store. Enabling the featured product option for different products in Hitpay turns all of your featured products to show every where at first. To make a product as a featured product:- Navigate to the Create/Edit Products page and enable the Featured Products checkmark.
- Click Publish/Save to save your changes.
Product on Sale
Encourage purchases by visibly demonstrating the savings customers will enjoy on sale items. To showcase your products on sale and display price comparisons:- Navigate to the Create/Edit Products page.
- Activate the On Sale option to signal that the product is offered at a discounted rate.
- Input the Price Before Discount, ensuring it is set higher than the selling price.
- Specify the Selling Price to indicate the current sale price of the product.
- The system will automatically display the price before discount with a strikethrough next to the selling price on your online store, allowing customers to easily see the price comparison and savings.
Shipping or Pickup Required
To ensure customers can choose a delivery method at checkout, leave the ‘Shipping or Pickup Required’ option enabled to mark your products as either shippable or available for pickup. If the product is a service or digital product that doesn’t require delivery, disable this option. If you’re using weight-based shipping calculations, be sure to specify the product weight.- Navigate to the Create/Edit Products page.
- Toggle the Shipping or Pickup is Required option to enable this feature.
- If enabled, a new option for Product Weight will be added at the product level and variant level, allowing you to specify the weight. This weight will be used to calculate shipping costs during the checkout process.
- Click Publish/Save to save your changes.
Adding Products in Bulk
This feature is only available from the web dashboard
- Handles Handles are unique names for each product and cannot contain spaces. You can use handles to update existing products or add product variants. While handles are not required, if you don't provide one, the system will automatically generate one based on your product name. If you need to find the handle to update existing products, you can export your current products to retrieve it.
- Products with Variants For products with variants, the CSV file structure is: The first row with the same product handle represents the main product. Variant names should be placed on the main product row under designated columns such as "Variant1 Name," "Variant2 Name," and so forth. The subsequent rows pertain to the product variants, and each row should include the corresponding variant values under columns "Variant1 Value," "Variant2 Value," and so on.
- Main Product Vs Product Variants The columns "Name," "SKU," "Description," "Publish," "Manage Inventory," and "Category" are specific to the core product and should be left blank in the CSV file for variant rows. These columns do not apply to variant entries.
Adding Products in Bulk from Shopify, Shopee and Lazada
Easily bring in your products from Shopify, Shopee, and Lazada. This import process is a one-time action and doesn't involve ongoing inventory synchronization. Any modifications to the product or inventory in HitPay or the external platform will not reflect in the other platform.- Shopify
- Shopee
- Lazada
To import products from Shopify, follow these steps:
- In your Shopify account, follow their guidelines to export your products.
- On your HitPay dashboard, navigate to Products > Products and click on Add Products In Bulk.
- Choose Shopify as the source and upload the previously downloaded CSV file.
- Click on Save.
- You will be notified by email when your Shopify products are imported into HitPay. If there are any issues with your file, the email notification will provide an explanation.
Open Amount Products
You can add Open Amount products to your online store. These products let customers enter the amount they want to pay at checkout—ideal for businesses that accept donations, offer services with variable pricing, or sell products where pricing is flexible. Unlike fixed-price products, Open Amount products offer more freedom for your customers while still benefiting from inventory tracking and product reporting.Common Use Cases
Open Amount products are especially useful for:- Donations: Perfect for non-profits or fundraisers collecting contributions online.
- Custom Services: Great for consultations, coaching, or creative work where pricing depends on the service.
- Digital Content: Artists or creators can let buyers choose how much to pay for downloads or exclusive content.
- Workshops & Events: Offer flexible pricing tiers for classes or events with sliding scale contributions.
- Variable Charges: Businesses that need to collect different amounts (e.g. vendors paying for different booth sizes via a single link).
How to Create an Open Amount Product
- Go to Products: Navigate to the Products section in your HitPay dashboard.
-
Create or Edit a Product:
- Add a new product or edit an existing one.
- Select the Open Amount option.
- Save the Product: The open amount product will now appear in your storefront.
-
Customer Checkout:
- Customers will see a field to enter their desired amount before checkout.
Customize Button Label and Admin Fee
You can further tailor the experience:- Customize the Add to Cart, Buy Now, and I want to pay labels to match your use case (e.g. “Donate”, “Contribute”, or “Enter your amount”). Learn how to customize these settings
- Apply a percentage-based admin fee to Open Amount products if needed. Learn how to apply admin fees
Performing Bulk Actions
HitPay’s Web Dashboard empowers you wth the ability to perform bulk actions on multiple products at a time. You have the ability to perform these actions:- Publish products
- Unpublish products
- Delete products
Inventory Management
To keep track of an item’s inventory, HitPay offers an intuitive inventory tracking feature that can be enabled by going to the Create/Edit Products page and turning on the Manage Inventory toggle- After enabling inventory management for a product, you can update the Available Quantity to store the product’s inventory.
(Optional) You can also set a low quantity alert. You will receive an email if the product’s quantity reaches the set quantity.
- Continue Selling When Out of Stock: Sometimes a product might be marked out of stock but you would like to continue selling anyway, simply check the Continue selling when out of stock checkmark.
One Page Checkout
The One Page Checkout feature lets customers view product details, choose options like variations or quantities, and complete their purchase on a single page. It eliminates multiple steps like cart review and separate checkout screens, making the process faster and simpler. This feature is ideal for:- Single-product purchases
- Digital products or services
- Direct product links from social media or messaging apps
?express_checkout=true, which takes customers straight to the one-page experience without showing other online shop pages.
Benefits
- Faster checkout for better conversions
- Reduced drop-offs from fewer steps
- Ideal for mobile and social sharing
How to Generate the One Page Checkout Link
To create the express checkout experience:- Go to a Specific Product: Navigate to your product in the dashboard.
- Click on Share: Click the Share button.
- Copy the Express Checkout Link: Copy the link with
?express_checkout=trueappended. - Share the Link with Customers: Distribute the link via your preferred channels (e.g. Instagram, WhatsApp or email).