Overview
The Quick Collect Kiosk Mode allows merchants to convert their HitPay POS device or tablet into a self-service payment terminal. This is ideal for charities, fundraising events, and community organizations, enabling donors to contribute seamlessly.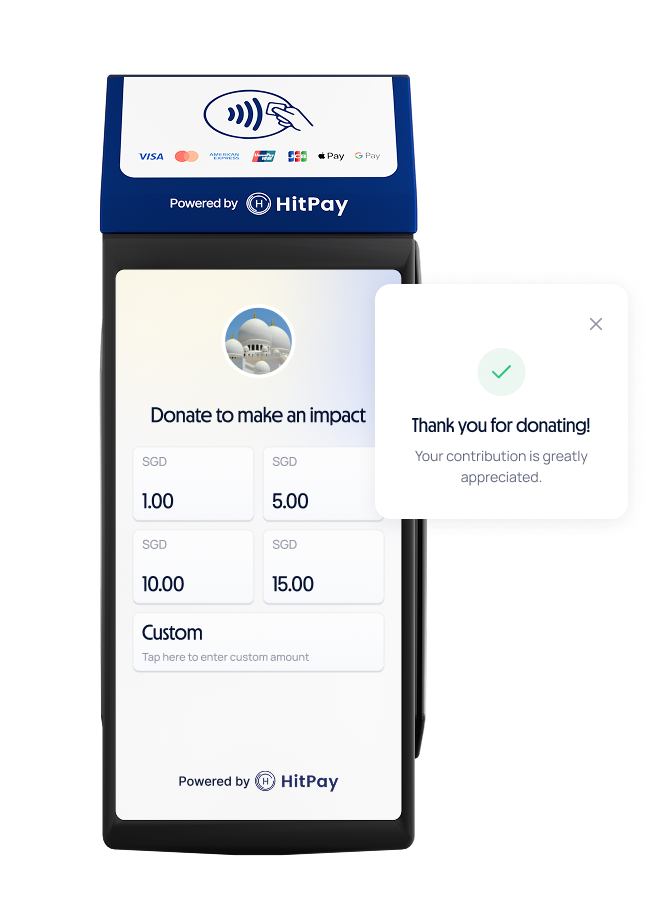
Value Proposition
- No Monthly Fees or Setup Costs: Start accepting donations without worrying about recurring charges or upfront expenses.
- Integrated Payments Processing : Seamlessly accept a variety of payment methods, ensuring a smooth donation process for all contributors.
- Customisable Options: Tailor the experience for your donors by setting predefined donation amounts and also customising your logo & brand.
- Donor Information Collection : Gather customisable details effortlessly for future engagement or record-keeping.
- Centralised Transaction Reports : Monitor and manage transactions across multiple kiosks from a single platform, streamlining your operations.
How to set up the donation kiosk?
DIY Setup (Devie/Tablet running HitPay app with HitPay Terminal)
Setup :
- If you haven’t purchased a HitPay terminal, please purchase from the Hitpay terminal store. Learn more here
- Prepare an a supported tablet and download the HitPay app. Click here to see details.
- Log in to your HitPay account on the app.
- Navigate to Settings > Quick Collect Kiosk and configure your settings
- Enter the Quick Collect mode by clicking the side menu > Mode > Quick Collect
HitPay Terminal with HitPay App Installed
Setup :
- If you haven’t purchased a HitPay Terminal, please purchase from the Hitpay terminal store. Learn more here
- Log in to your HitPay account on the app.
- Navigate to Settings > Quick Collect Kiosk and configure your settings
- Enter the Quick Collect mode by clicking the side menu > Mode > Quick Collect
How to customise the display?
You can customize the Quick Collect Kiosk display via the HitPay POS app. Customization Options include :- Identifier (This will be displayed in the “remark” column of your transaction details)
- Business Photo
- Welcome Message - A short message to greet donors (e.g., “Donate to ABC Charity”).
- Thank You Message – A message displayed after a successful donation (e.g., “Thank you for your support!”).
How to change the preset amounts ?
- Open the HitPay POS app.
- Go to Settings > Hardware > Quick Collect Kiosk.
- Tap “Amount Settings”.
- Choose up to 4 preset donation amounts (e.g., 20, 100).
- Toggle “Allow Custom Amount” if you want donors to enter their own amount.
- Tap Save to apply the changes.
How can I collect customer information / additional information ?
How to Enable Customer Information Collection- Open the HitPay POS app.
- Go to Settings > Hardware > Quick Collect Kiosk.
- Tap “Checkout Settings”.
- Enable: Collect customer information.
- Tap Save to apply the changes.
- Open the HitPay POS app.
- Go to Settings > Hardware > Quick Collect Kiosk.
- Tap “Checkout Settings”.
- Enable: Collect additional information.
- Tap Save to apply the changes.
How will the Quick Collect mode work for end-customers?
Select a Donation Amount- Donors choose a preset amount (e.g., 20, 100).
- If custom amount is enabled, they can enter any amount manually.
- If a default payment method is set, the donation will proceed directly to payment.
- If not, donors will see a list of available payment methods (excluding Cash, Scan to Pay, Payment Links, and Card).
- The donor completes the payment using the selected method.
- Once successful, the Thank You Message is displayed.
- Donors can scan the QR “Receipt” to receive a digital receipt.
- If no action is taken, the screen will automatically return to the donation page after 1 minute 30 seconds.
FAQs
What hardware do I need to set up my Donation Kiosk?
What hardware do I need to set up my Donation Kiosk?
For the most seamless payment experience, we recommend the HitPay All-In-One terminal or FlexiPOS — an out-of-the-box donation kiosk and payment terminal.If you already own a HitPay app-compatible device, you can opt for our DIY setup instead. Simply pair your device with any of our HitPay card terminals.
HitPay POS Software is adaptable and suitable for various industries, including retail, hospitality, food service, healthcare, online ordering, and more.
How long does it take to set up?
How long does it take to set up?
After creating a HitPay account, as well as ordering and receiving the required hardware, setting up the Donation Kiosk typically takes 10 minutes. No coding or technical expertise is required.
Can I use multiple kiosks and track them together?
Can I use multiple kiosks and track them together?
Absolutely. You can manage all your kiosks on the HitPay dashboard or mobile app.
What are the fees involved with the Donation Kiosk?
What are the fees involved with the Donation Kiosk?
Setting up the unmanned Donation Kiosk will require a one-time purchase for your preferred card terminal.
Our Donation Kiosk POS software has no setup, recurring, or subscription fees.
ou only pay per transaction for completed donations. Click here to see pricing in your market.