Account Setup
Before you begin integrating HitPay Payment Gateway Plugin into your your Wordpress site, you need to set up your HitPay account and ensure some prerequisites are met:- Merchant once created an account with HitPay payment gateway, they can go to their HitPay dashboard and choose the payment options they would to avail for their site.
- And merchant need to copy the API keys and Salt values from the HitPay Web Dashboard under Settings > Payment Gateway > API Keys
- HitPay Payment Gateway for WordPress Info:
- HitPay Tags: HitPay, payment gateway, woocommerce
- QR code Requires at least:
4.0Tested up to:6.8Stable tag:4.1.9 - Requires PHP:
5.5WC requires at least:2.4WC tested up to:9.8.1License: MIT
Integration Guide
Installation
Uploading in WordPress Dashboard
1.Navigate to the ‘Add New’ in the plugins dashboard 2. Navigate to the ‘Upload’ area 3. Select hitpay-payment-gateway-for-wordpress.zip from your computer 4. Click ‘Install Now’ 5. Activate the plugin in the Plugin dashboardUsing FTP
- Download
hitpay-payment-gateway-for-wordpress.zip - Extract the
hitpay-payment-gateway-for-wordpressdirectory to your computer 3. Upload thehitpay-payment-gateway-for-wordpressdirectory to the/wp-content/plugins/directory 4. Activate the plugin in the Plugin dashboard
Configuration
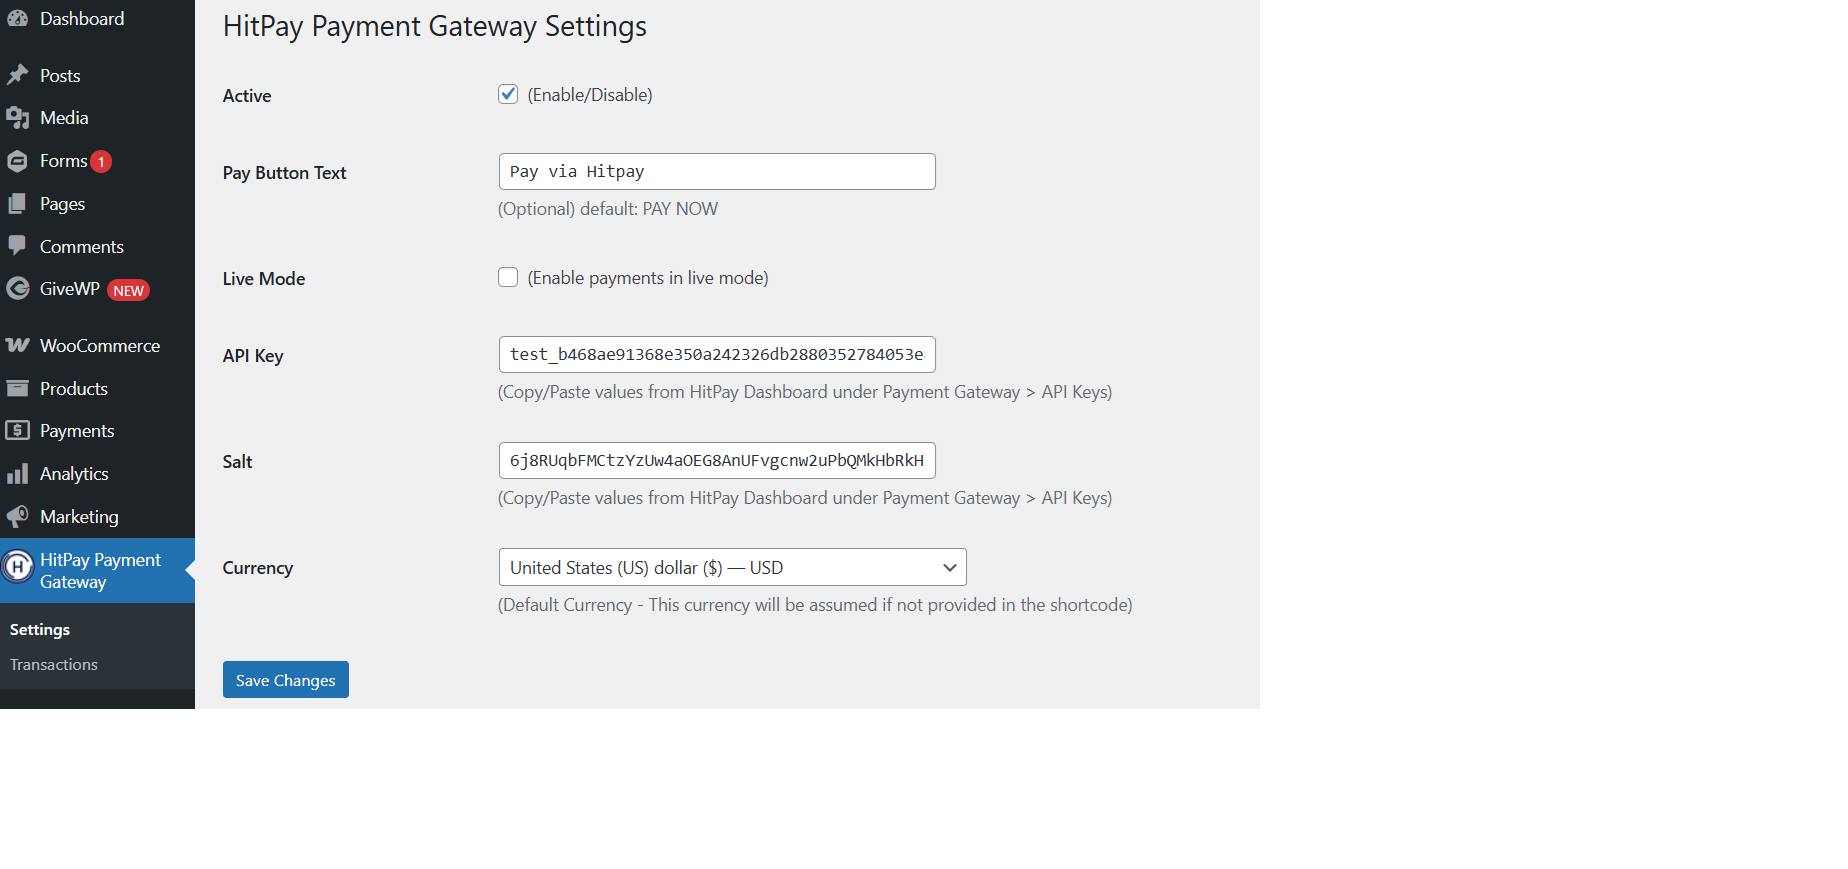
- Go to HitPay Payment Gateway => Settings
- Active: Enable/Disable this payment option
- Pay Button Text: If button text is not provided in the short code, this default button text will be used.(for example: “HitPay or Credit card or PayNow”)
- Live: Enable payments in live mode
- Copy the API keys and Salt values from the HitPay Web Dashboard under
Settings > Payment Gateway > API Keys - Currency: If currency is not provided in the short code, this default currency will be used.
- Click “Save Changes”
Shortcode
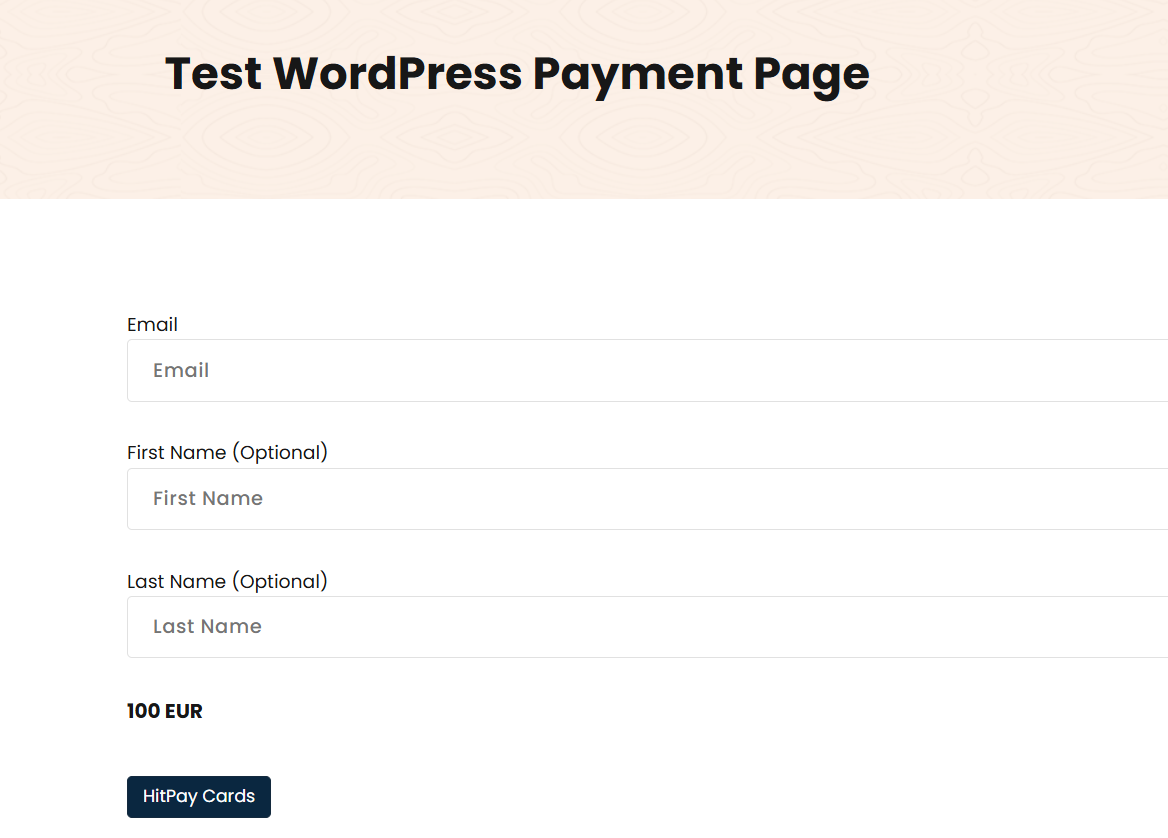
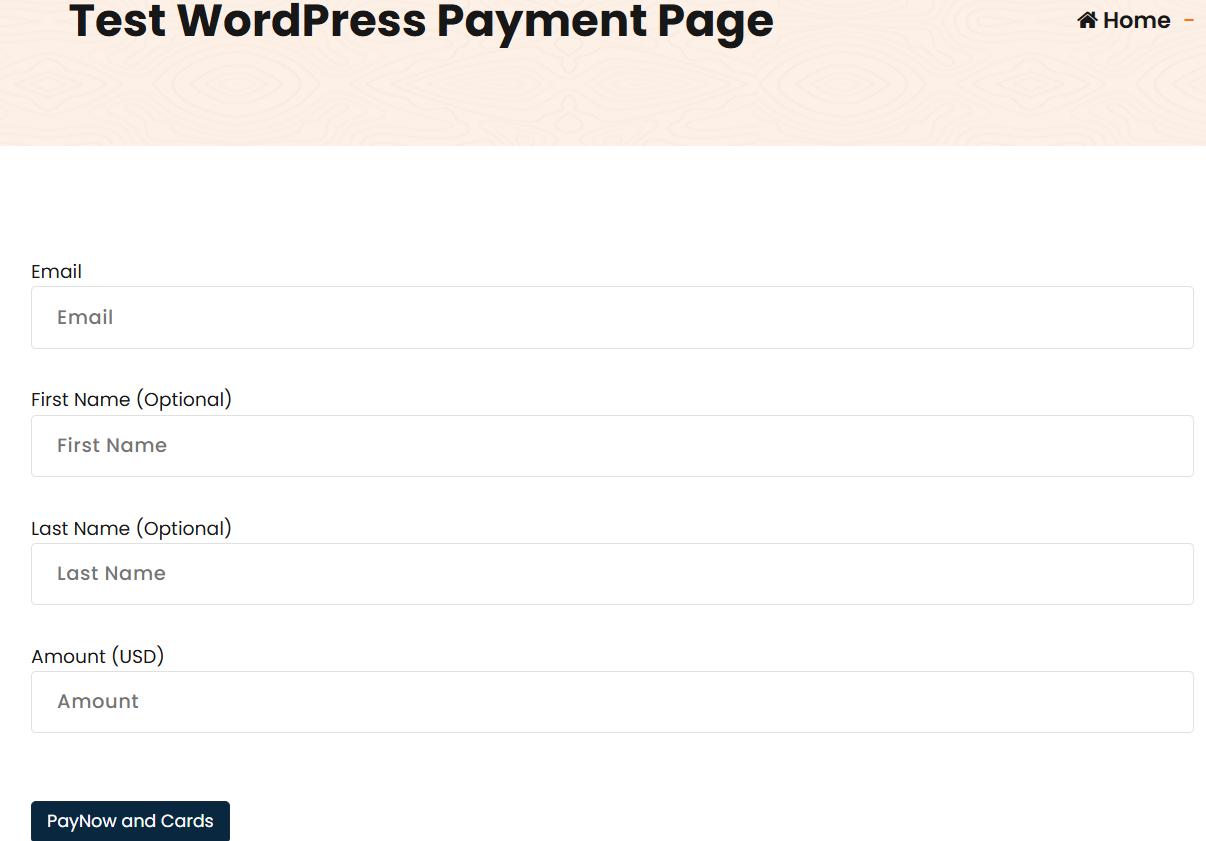
Insert the shortcode anywhere on your page or post that you want the form to be displayed to the user.
- Basic: For the below code, requires the user to enter amount and email to complete payment, default button text and currency will be used. [hitpay-paynow-button]
- With button text: For the below code, requires the user to enter amount and email to complete payment, provided button text and default currency will be used. [hitpay-paynow-button]HitPay Cards[/hitpay-paynow-button]
- With attributes: email or
use_current_user_emailwith value"yes", amount. [hitpay-paynow-button amount=100 email=“customer@email.com” ] or [hitpay-paynow-button amount=100 use_current_user_email=“yes” ] - With attributes email, amount and currency with button text: [hitpay-paynow-button amount=100 email=“customer@email.com” currency=EUR ]HitPay Cards[/hitpay-paynow-button]
Manage Payment Transactions
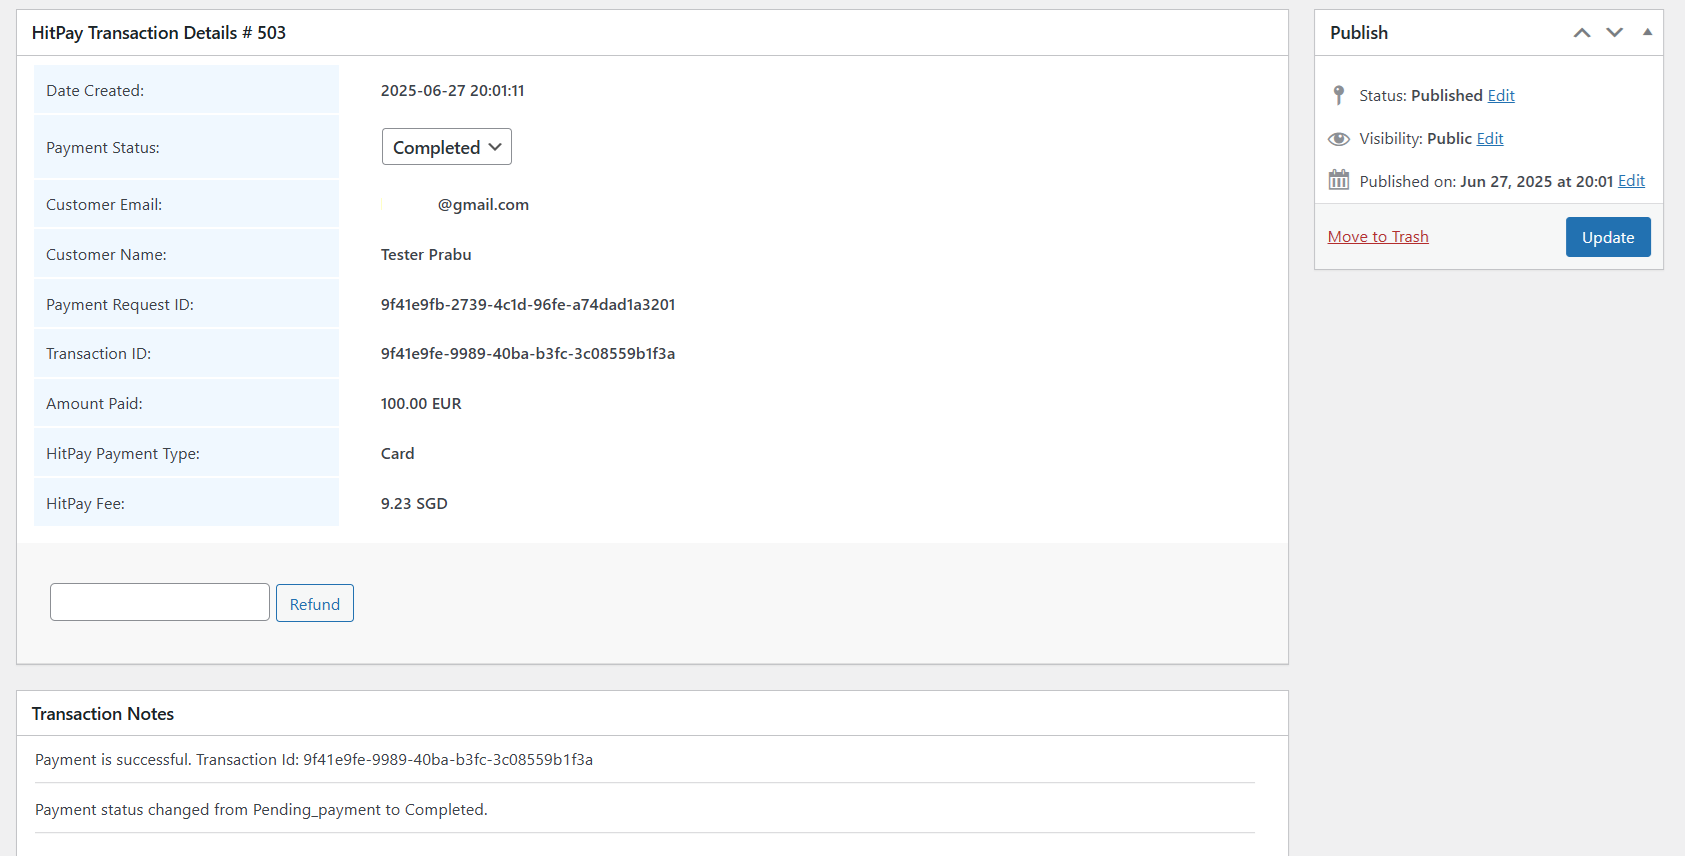
The user can manage the payment transactions from WordPress Admin.- Go to
HitPay Payment Gateway => Transactions - Click view link to Transaction details
- Admin can change the payment status

Refund
The user can refund the payment transactions from WordPress Admin.- Go to
HitPay Payment Gateway => Transactions - Click view link to Transaction details
- Enter the amount and click refund button
Refunds will only be successful if they meet the criteria of the payment
method used. Click
Here for more
details. If the refund fails, please try to refund directly from the HitPay
dashboard under “Transactions > Select > Refund” to know the exact error.
FAQs
I have completed the plugin setup but I am unable to proceed to the payments page
I have completed the plugin setup but I am unable to proceed to the payments page
If you have completed the plugin installation and if you still see an error message
Something went wrong please contact the merchant on the checkout page, please make sure to check the following:- In your plugin settings, ensure it's not in test mode (
Live Modeshould be enabled). - Make sure that the
API KeyandSaltValue are correct. You can find them in your dashboard under the "API Keys" Menu https://dashboard.hit-pay.com/. - Ensure that the store
checkout currencyis supported by your account. Click here for more details on the currencies supported. Minimum amountfor each payment method could be different, please ensure that the checkout amount is above the minimum amount.
Do I need an API key?
Do I need an API key?
You can copy the API keys and Salt values from the HitPay Web Dashboard
under
Settings > Payment Gateway > API Keys.